The Divi Contact Form module allows you to create great contact form pages. But in order to achieve results -that is making people to fill the form and send it- you have to put all your efforts in creating an outstanding contact form.
Although the Divi theme contact form module is a powerful tool to allow users sending messages, email sending and spam protection is a complex process that may cause some problem.
If you’re dealing with an issue and contact form is not sending mail follow this link and learn how to fix it.
Learn here all about the Divi Contact Form Module
Adding contact form module to a page
In order to add a contact form module to a page, enable Divi builder after creating the page and open visual builder.
Once you are in visual builder, click the grey plus button to add a new module. Before doing this you must add a row to your page, as modules can be added only inside rows.
Locate the contact form module within the list of modules and click on it to add it to your page.
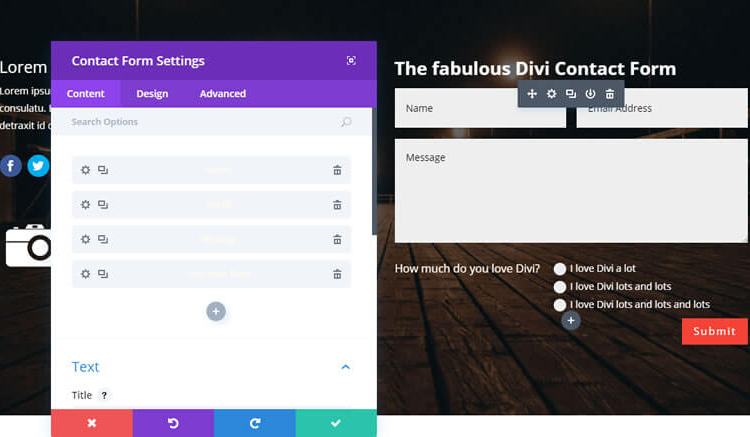
After adding contact form module, you will see the module’s options. These are separated into three main groups: Content, Design and Advanced. We’ll talk about this next
Contact Form Content Options
In this tab you can manage each content element. Everything that is displayed in contact form module can be controlled here.
These are the options avaiable:
Title
Set the title for your contact form.
Success Message
What you write here will be shown to users after succesfull form submission. If leaved blank a default message will be used
Submit Button Text
Text to be displayed in submission button
Email
Here you must enter the mail where messages should be sent.
Message Pattern
Customize here the message itself. Fields should be entered using the following format: %%field_id%% were the id is one of the fields of the form.
For example use %%field_phone%% for text entered in correspondent field, or %%field_message%% for the message.
So you can enter here something like My message is %%message%% and phone number is %%phone%%.
Display Captcha
Turn on and off the Divi captcha
Enable Redirect URL
Turn on redirection to another page after successful form submission
Redirect URL
If redirect URL is enabled, paste here the URL where you want users to send after form submission.
Form Background Color
Modify the background color of form fields
Admin Label
Change label shown in Divi builder for better organization of your modules.
Contact Form Design Options
In this tab you can style the contact form module as you wish.
Each module has a long list of styling options you can use to customize every single element.
Title Font
Change default font of title here. Or use bold, italic, all-caps or underline styling only in title
Title Font Size
Adjust font size by using the slider or enter the value in px or em measures.
Title Text Color
Modify color of the title font.
Title Letter Spacing
Customize the title text by increasing or decreasing the space between each letter.
Title Line Height
For long titles, if they are displayed in two lines or more. You can adjust the space between lines here.
Form Field Font
Set font to be applied to text used in fields
Form Field Font Size
Size of fields font
Form Field Text Color
Color of fonts used in field
Form Field Letter Spacing
Define the space between letters in field texts.
Form Field Line Height
Separation between lines in fields.
Use Border
Enable or disable border around your fields.
Input Border Radius
Increasing border radius will give your fields form with more rounded corners. Set to zero for 90 degrees angle.
Border Color
Set the color you want to apply to borders
Border Width
Default width of borders is 1 pixel. Increase this value to get thicker borders.
Border Style
Select one of the eight border styles available: Solid, dotted, dashed, double, groove, ridge, inset or outset.
Use Custom Styles for Button
Enable this option to access button customization
Button Text Size
Modify the size of the text within button
Button Text Color
Change color of button text.
Button Background Color
Change the default background color of button
Button Border Width
Set width of the button’s border. If you want to remove border enter zero here.
Button Border Color
Assign a custom border color to the button
Button Border Radius
Style your button border by modifying corners, increase for rounded corners and decrease for opposite effect.
Button Letter Spacing
Modify space between letters displayed in button
Button Font
Select a font to be used only in button
Add Button Icon
Enable or disable icons showed in button.
Button Icon
Pick which icon to use in your button. Divi has various icons to choose from.
Button Icon Color
Change the color of the icon that appears in your button.
Button Icon Placement
Select position were you want icon to be shown. Left or right side
Only Show Icon On Hover for Button
If you would like the icon to always appear, disable this setting.
Button Hover Text Color
When button is hovered over by a visitor’s mouse, this color will be used.
Button Hover Background Color
Select background color to be applied when user hovers over button
Button Hover Border Color
Set border color to be used when user hover over button
Button Hover Border Radius
Same with border radius
Button Hover Letter Spacing
Idem with letter spacing
Contact Form Advanced Options
Advanced users will find here useful tools for styling contact form module elements using CSS scripts.
CSS ID
An CSS ID can be entered here to create custom CSS styling.
CSS Class
Add multiple CSS classes separated with a space.
Custom CSS
Within the Custom CSS section, you will find a text field where you can add custom CSS directly to each element.
Visibility
Choose here the devices you want your module to be displayed for. Useful if you want to use different modules on each device or if you want to simplify the module for mobile devices by hiding certain elements


